The following article will cover the best outdoor wireless access points by providing in-depth analysis for each product and a comprehensive guide for all the features to look for before deciding to purchase a specific device.
UPDATE 02.10.2019: The XCLAIM XO-1 Outdoor AP has been removed from the best outdoor wireless access points list because the manufacturer decided to announce that the entire series will be EOL by 2021 (at the moment, the status is End of Sale).
UPDATE 08.25.2020: The Mikrotik NetMetal ac2 Outdoor Access Point has been added to the list.
QUICK NAVIGATION: FEATURES TO LOOK FOR BEFORE CHOOSING THE BEST OUTDOOR WIRELESS ACCESS POINT
| DrayTek VigorAP 920RP | MikroTik NetMetal ac2 | Engenius ENH1750EXT Outdoor AP |
 |
 |
 |
| Read More | Read More | Read More |
 |
| Cambium ePMP 2000 Outdoor AP | TP-LINK CPE510 Outdoor Access Point | Ubiquiti Bullet M2 | Ubiquiti UniFi AP Outdoor+ |
 |
 |
 |
 |
| Read More | Read More | Read More | Read More |
|
|
|
|
ALSO CHECK OUT: THE BEST INDOORS WIRELESS ACCESS POINTS
1. DrayTek VigorAP 920RP Outdoor Wireless Access Point

Similarly to Ubiquiti, DrayTek has aimed towards bringing enterprise-level features to the SMB and consumer market, with the focus on adopting the VPN technology to lower-cost routers (such as the widely popular Vigor 2925ac), but, over time, the reach of the Taiwanese Company has expanded and it has also developed high-end indoors and outdoors access points.
Quite recently, Draytek decided to renew its SMB-suitable VigorAP line with three new outdoor PoE wireless access points, from which I’m going to focus on the dual-band VigorAP 920RP, a device that besides being rugged enough for harsh outdoor conditions, it also takes advantage of some Wave 2 features to enhance the wireless performance (such as MU-MIMO).
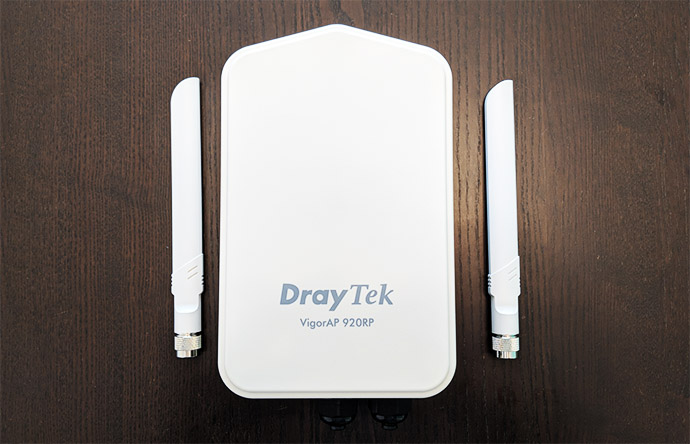
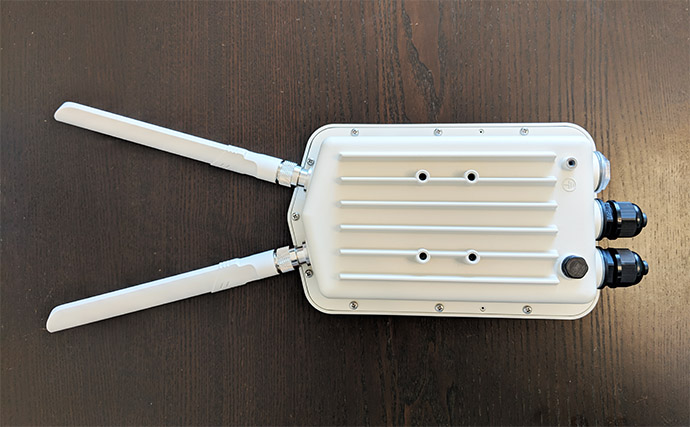
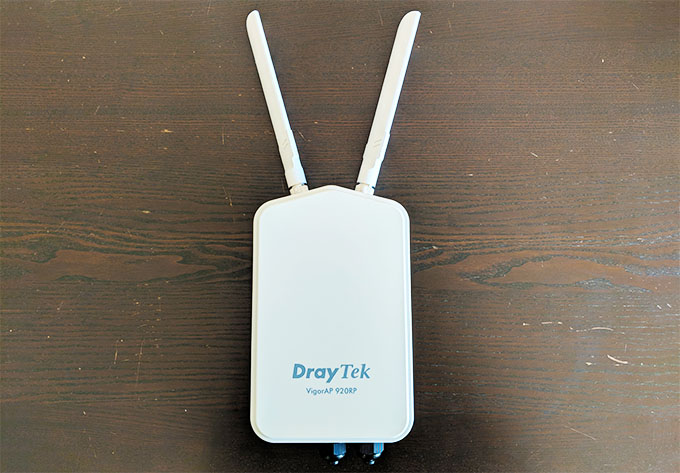
The DrayTek VigorAP 920RP features a relatively thick case, the front being made of sturdy plastic, while the rest of the body is made out of a metallic alloy; the device is covered by a white matte finish and it has two antennas that point upwards from the top (detachable and upgradeable – the RPD model also comes with an internal directional antenna for Point-to-Point deployment). The front of the device is simple and plain, with only the logo and model name, while the rear side is covered by metallic fins to ensure a proper heat management.
It’s obvious from the industrial look and the fact that it lacks any cut-outs to expose the internal hardware that we are dealing with an outdoor-suitable device, so everything is sealed and protected from the elements. The VigorAP 920RP is IP67 certified, therefore, it can survive submersions under water down to 3 feet for about 30 minutes and it has complete protection against dust (if you live in an area with lots of strong storms, it is advisable to take advantage of the grounding kit, as well as add lightning surge protectors or dedicated rods to ensure that the device will survive unscathed). Furthermore, the 920RP will operate if the temperature ranges between -40º to 158º Fahrenheit and if the humidity level (non-condensing) is within 5 to 95%.
Along with the VigorAP 920RP access point itself, DrayTek also provides, in the box, a mounting kit and a couple of U-screws, so you can either mount the unit on the wall or on a pole (you can also use zip ties), just be aware about the dimensions and the weight of the device (10.0 x 6.3 x 3.1 inches and 2.42 lbs). The package also contains an Ethernet cable and a Quick Start Guide, but it lacks a PoE Injector, so you’ll either have to rely on a PoE switch or buy your own adapter.

While the front is quite plain, the back of the VigorAP 920RP is lot more crowded because of the protruded fins, but they have a key role into maintaining the temperature as low as possible and, thanks to the alloy case, the device remained cool even when it was put under stress.
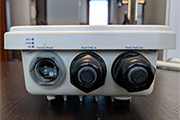
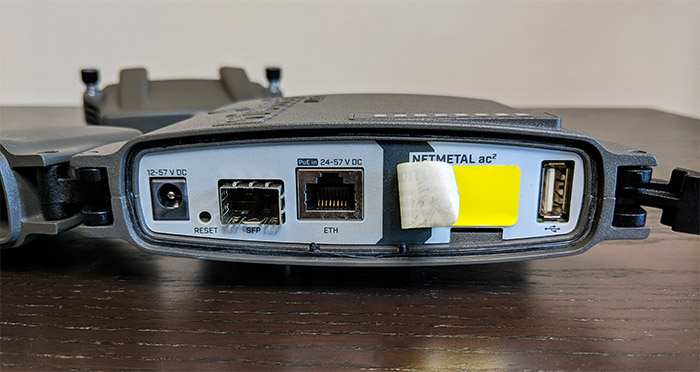
If you search the case for the usual array of LEDs, you won’t find any because DrayTek decided to position them in an unorthodox manner: on the bottom, the first (out of three) sealed cut-outs is covered by transparent plastic and it exposes two sets of three LED indicators, each set showing the status of one Ethernet port – the first LED indicates the Activity (blinking green when the system is ready), while the second and the third LED will light up green when there are clients connected to the 2.4GHz and/or the 5GHz network (solid when the WiFi is ready and flashing when the data is either being sent or received).
Underneath the second removable cover, there’s a PoE-In RJ45 Ethernet Gigabit port (used to power the device and to connect it to the Internet) and underneath the third cover, there’s a PoE Out Ethernet Gigabit port (useful if you want to connect additional wired devices, such as a PoE camera which can also be mounted on the same pole). Between the two sets of LEDs, there is a small recessed Reset button (to return the device to the default factory settings).
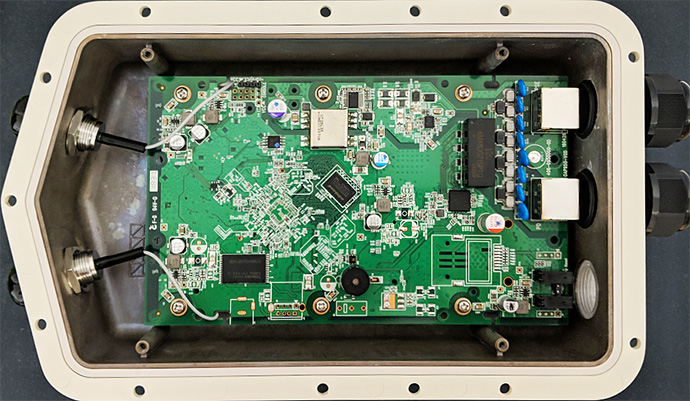
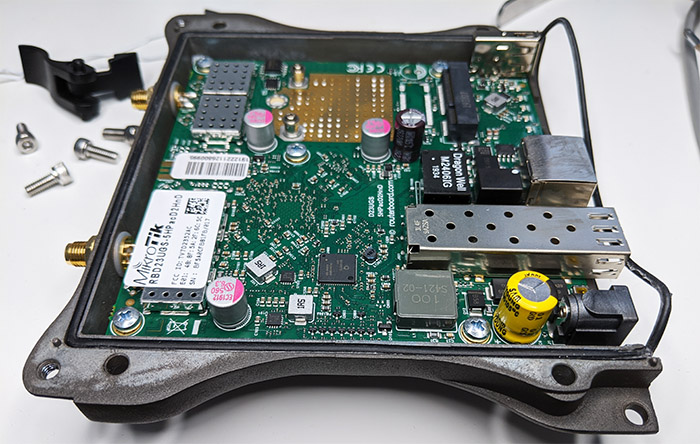
Inside the case, the VigorAP 920RP is equipped with a Qualcomm Atheros IPQIPQ4029 SoC, 256 MB of RAM (from Winbond) and 128 MB flash storage (from Toshiba) / 4MB (from MXIC), a Qualcomm Atheros QCA8072 switch chip and a TPS23754 802.3at PoE controller.
Before installing the DrayTek VigorAP 920RP, you should be aware of two things: first of all, it is ideal to install the device as high as possible to achieve a better link quality and secondly, the antennas should point towards the router (or at least in its general direction, considering that they’re not really omnidirectional).
In order to install the unit, you have to remove the covers (to reveal the two ports – as said before, the second should only be used to connect additional wired clients), insert an Ethernet cable into the LAN PoE port (middle port) and the other end of the cable to the PoE injector and plug the Power cord into the DC port of the PoE injector. Afterwards, in order to configure the device, you need to plug another Ethernet cable to the PoE injector and into a computer.
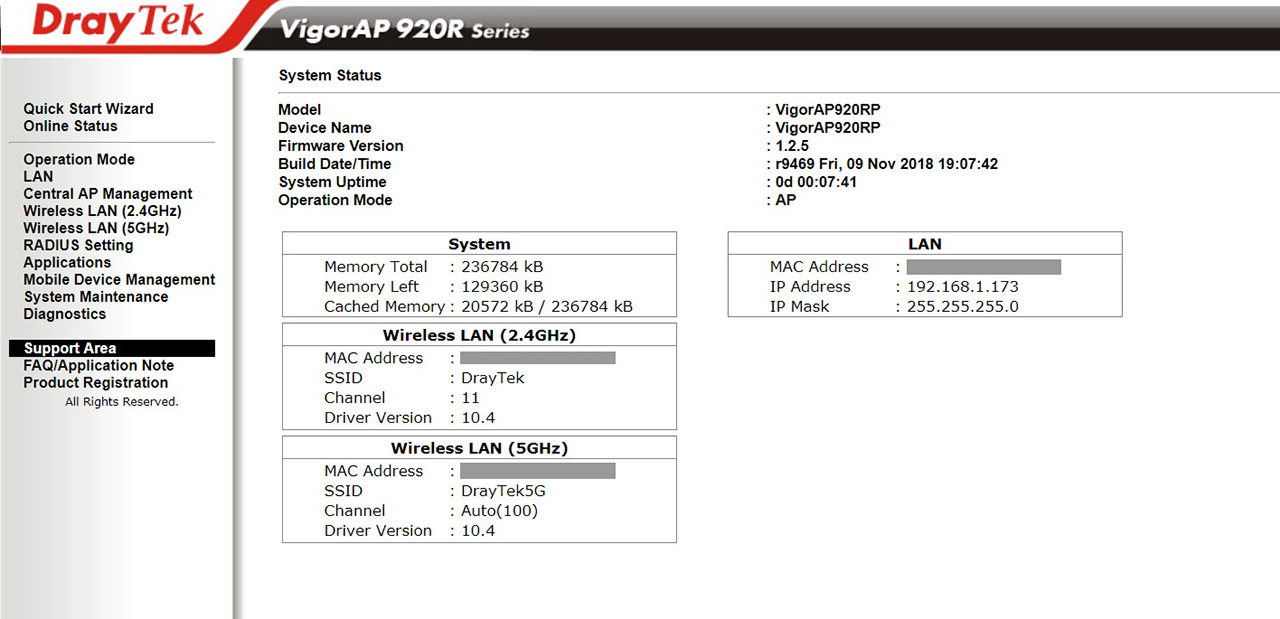
In order to configure the VigorAP 920RP, Draytek provides a web-based utility, which can be accessed by going to the device’s IP address (check it in the router’s UI), using any web browser – immediately after accessing the interface, you should change the password (to do so, got to the Administration Password). If you run the Quick Start Wizard, you can select a different Operation Mode (can be Universal Repeater or AP-Bridge – Point-to-Point or WDS Mode). Other areas of interest are the General Management, which includes the ability to create a Black List or enable Auto Provisioning; there’s also the AP Discovery, the Station Control Fast Roaming (802.1x) or the Band Steering.
Since this type of devices are rarely used as a standalone, a controller is a necessity when you have to deploy multiple access point on various sites and, thankfully, the VigorAP 920RP can indeed be adopted within a larger environment containing not only access points, but also Vigor routers. Unlike the other access points that I have recently tested (such as the Ubiquiti UAP-AC-PRO, Zyxel NWA1123-AC HD or TP-Link EAP245), I did not get immediate access to the controller, but I had to request it from the official website via email.
Once received, things remained less user-friendly, since I had to also install OpenJDK and MariaDB and, once everything was installed, I could choose between local and remote. Choosing the former for testing purposes did not finish the process, since, I also had to go to the Vigor ACS 2 interface (the controller) and to the standalone interface and pair them (read the full review for instructions). What I do like about the VigorAP 920RP is that it doesn’t force or persuade you to use the controller and you can get almost every option and feature using the default interface.
Note: Inside the device, DrayTek has implemented a buzzer to let you know where the AP is located.
The DrayTek VigorAP 920RP has a large coverage and I could connect to the network even at about 670 feet, but, depending on your devices, you may not want to go beyond 400 feet because smartphones and tablets are limited by the FCC regulation for public exposure. Obviously, the less noise and interference, the better the signal and range (in an area with lots of trees, buildings and other 2.4GHz devices, you will not maintain a stable signal). But, in line of sight, I could get around 76 Mbps on the 5GHz network and 105 Mbps on the 2.4G at 70 feet. Further out to about 460 feet, I measured an average of 8.95 Mbps on the 5 GHz network and 27 Mbps on the 2.4GHz network; at 670 feet, only the 2.4GHz network remained relatively reliable and I could measure an average of 7.5 Mbps.
2. MikroTik NetMetal ac2 Outdoor AP

MikroTik has managed to grab a seat among the most popular manufacturers of networking products in the world due to its excellent SMB-suitable hardware and especially thanks to the flexibility of the RouterOS. But, this opinion is shared among the IT specialists, while the home users have usually steered clear of MikroTik products. And it’s understandable because while the feature-packed RouterOS is a great piece of software, it requires a rather steep learning curve before starting to understand how things work. That being said, Mikrotik has recently released the NetMetal ac2 which has kept the rugged build of its predecessors, but it has improved the internal hardware and considering that not many manufacturers offer a fully metallic enclosure at an affordable price point, it’s worth adding it to the best outdoor access points list.
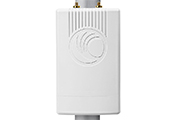
The NetMetal ac2 has the same exterior as the NetMetal 5, featuring a robust metallic case that can be divided into three parts, the middle being the access point itself. Remove the two large spring-operated screws and you will be able to access the antenna area (as well as the Auxiliary ports that need to be drilled) and no, Mikrotik did not add any antennas in the package. You should be able to use a couple of 4-5dBi antennas if you’re not planning to cover a larger area, but if you want to go for a PtP system, you need to purchase a high gain antenna that can fully utilize the new hardware. The other side has a different opening mechanism (it remains attached on one end) and here are positioned all the ports and connectors. I know that some of you are very fond of the RBSXTG-5HPnD-SAr2 which is another affordable outdoor wireless access point, but Mikrotik was a bit vague about how resistant it was to the elements. The NetMetal ac2 clearly has the IP66-rating in its specs list, so it is protected against dust ingress and against powerful jets of water directed towards the enclosure. This means that a storm won’t pose any problems, just make sure to add some protection against lightning if you want to mount the AP on a pole.
As for the cold weather, the NetMetal ac2 should remain operational when the temperature ranges between -40 degrees F and 158 degrees F, so it’s more suitable for milder winters. I also opened the case of the NetMetal ac2 to see its internal hardware and the device is equipped with a quad-core Qualcomm IPQ4019 CPU (the ARM 32-bit architecture), 16 MB of flash memory (from Winbond), 256MB of RAM (from Nanya) and a Qualcomm QCA8072 dual-Ethernet Phy controller. It’s also worth noting that Mikrotik relies on a silicone band to keep the water and dust from entering the enclosure. Inside the package, there is the NetMetal ac2 unit, a PoE adapter (not that many manufacturers add one in the box), a power adapter, a mounting ring, a mounting bracket and a Quick Setup Guide. The wireless access point was definitely designed to be mainly mounted on a pole (there is a dedicated area for it on the rear side), but Mikrotik has also added the bracket if you want to attach the AP to a larger antenna or even a wall.
On the front of the NetMetal ac2, there is a small rectangular zone which contains eight LEDs, from which three will show the status of the power, SFP and Ethernet, while the last five will show the wireless signal strength: the LEDs go from bottom to top and will light depending one the calculated dBm, therefore, the lowest will be lit, if the signal is less or equal to 89dBm and the highest will be lit if the signal is equal or less than 61dBm. As I said before, you need to remove a metallic cover to access the ports and after doing so, you’ll be able to see a DC power port, a Reset button, an SFP port, a 10/100/1000M Gigabit Ethernet port (802.3af/at PoE), a microSIM slot and a USB port.
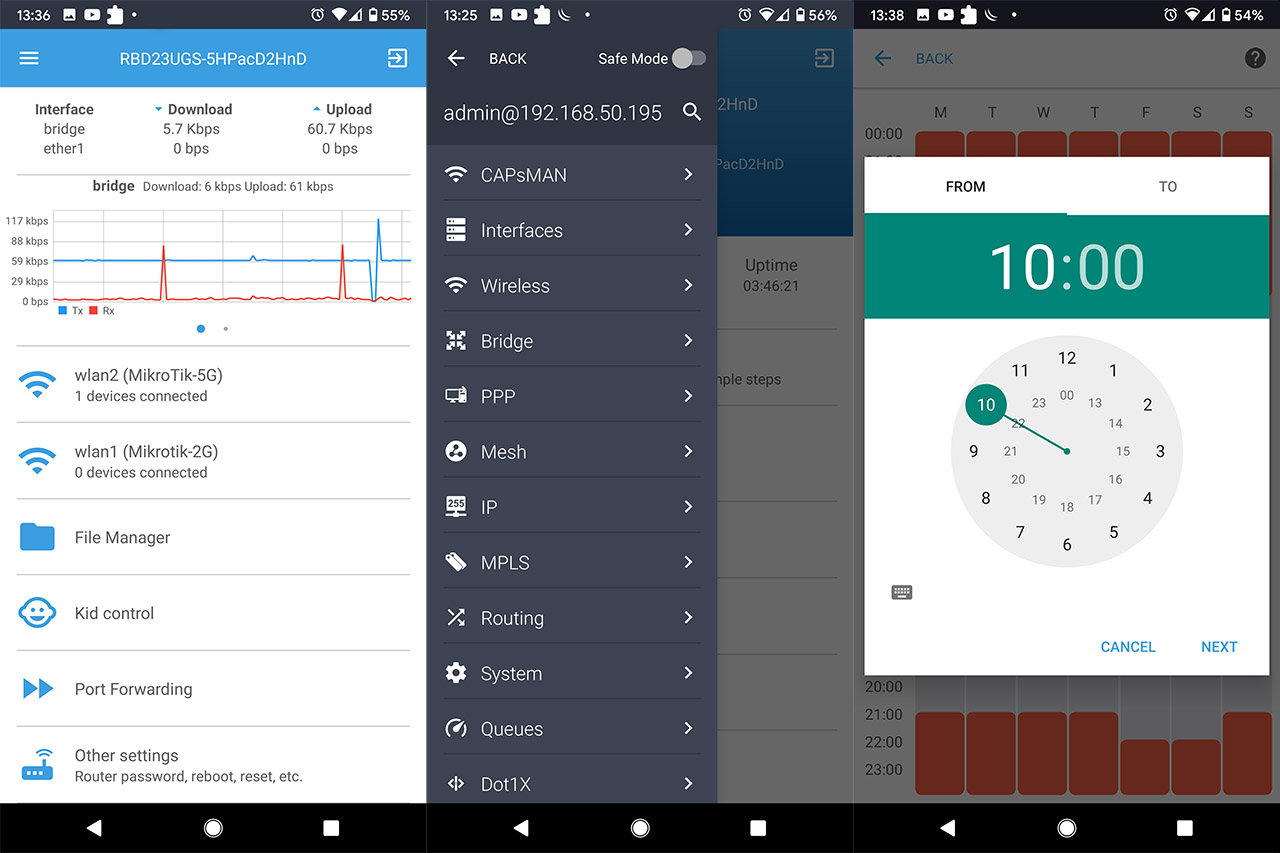
MikroTik NetMetal ac2 uses the RouterOS (level 4 license) as the operating system which will help you configure your network. You can easily access the software entering the AP’s IP, but you can also use the Mikrotik Winbox utility (the WebFig and the Command Line Interface are also available) to connect to the IP address and, when prompted to insert the user name and password, insert admin and leave a blank space for password (the Winbox can also be used to connect to the MAC address of the device). The Level 4 license for the RouterOS includes the ability to configure the device as a WISP Access Point, CAP, CPE, PTP Bridge, PTP Bridge CPE, Home MEsh and Home AP Dual. Furthermore, if you decide to use more than one Mikrotik access point for your site, you should give CAPsMAN a chance: it’s a controller that allows the admin to quickly manage and configure multiple access points at the same time. I’m not going to lie, if you’re going the web-based UI route, the configuration of the MikroTik NetMetal ac2 is not as straight-forward as it should be, but the good news is that you can find everything online (and there’s even a wiki page dedicated to RouterOS, so it can help those that have just begun using Mikrotik devices).
Mikrotik seems to be aware that the newcomers will feel intimidated by their ‘corporate’ approach, so they also made available a mobile application that offers a better step-by-step initial configuration wizard and it’s actually quite impressive that Mikrotik has managed to include pretty much every feature of the RouterOS available on the web-based GUI on their app.
I have tested the Mikrotik NetMetal ac2 using a couple of 5dBi antennas and yes, you will have a better coverage using some high gain antennas, but even with this setup the wireless access point did very well indoors (you can check the test results in the full review) and it performed similarly to the VigorAP 920RP when outdoors. As with any long-range wireless access point, the performance will be almost entirely dependent on the WiFi adapter on the client device. In my case, I used the same laptop with the Intel 8265 WiFi card (as with the VigorAP 920RP) and, while keeping the line of sight as clear as possible (yes, there were some trees in the way), the performance was decent. That being said, on the 5GHz network, at 70 feet, I measured an average of 93.8 Mbps and on the 2.4GHz network, I saw an average of 39.3 Mbps.
Changing the direction and increasing the distance to 460 feet, I measured an average of 41.3 Mbps on the 5GHz network (802.11ac) and an average of 13.5 Mbps on the 2.4GHz network. The farthest point that I tested the NetMetal ac2 was at 570 feet (I did try at 650, but there was too much interference to get a usable throughput); at this location, I measured an average of 41.6 Mbps on the 5GHz network and an average of 20.2 Mbps on the 2.4GHz WiFi network.
3. Engenius ENH1750EXT Outdoor Access Point


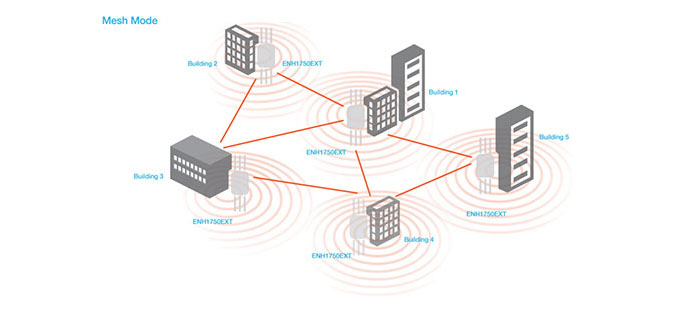
Engenius is one of the two brand names used by Senao Networks (a Taiwanese manufacturer which is known for its enterprise-class and SOHO equipment around the world), having its main focus towards creating long-range wireless communication network devices suitable for both indoors and outdoors deployments. Not long ago, I had a look at EnGenius Long Range ENS202EXT outdoors access point which turned out to be an excellent device, delivering a solid wireless performance and being able to withstand a harsher environment, but, as newer technologies get developed at a fast rate, the manufacturers of networking equipment have to keep up, so Engenius went a few steps further from the older 802.11n standard and released the Engenius ENH1750EXT, a dual-band rugged access point which promises to cover a larger area with WiFi, it has better protection against the elements and it has two PoE+ ports for connecting a larger array of devices.
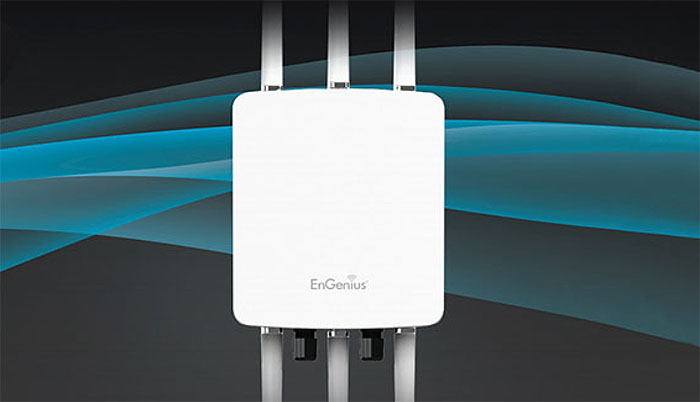
With the emergence of the dual-band access point series, Engenius has changed the design formula quite a bit, going from the long and narrow form-factor (ENS202EXT) to a wider and more robust exterior (ENS1750). But, to be honest the ENH series has always been larger, so it’s no surprise ENH1750EXT has kept the same size and weight as the 802.11n-only ENH710EXT and ENH220EXT, featuring that wide rectangular case, with soft rounded corners and covered by a white matte finish (no fingerprints magnet).
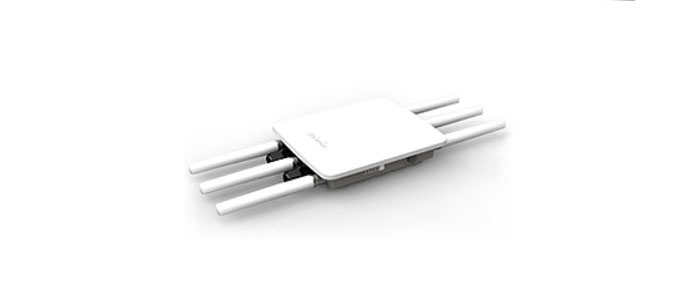
But don’t be fooled, the ENH1750EXT does not look consumer-friendly, as it has an industrial look and it is huge (it measures 11.22 x 8.58 x 2.10 inches), but not because of its main body, it’s because of the six detachable antennas, from which three rise from the top and three from the bottom (giving it a menacing look – it resembles a large white beetle). Out of the six antennas, three 5dbi omni-directional antennas are dedicated for the 2.4GHz radio band (two on top and one on the bottom), while the other three 7dbi omni-directional antennas are dedicated for the 5GHz radio (one on top and two on the bottom) – each connector is properly labelled.
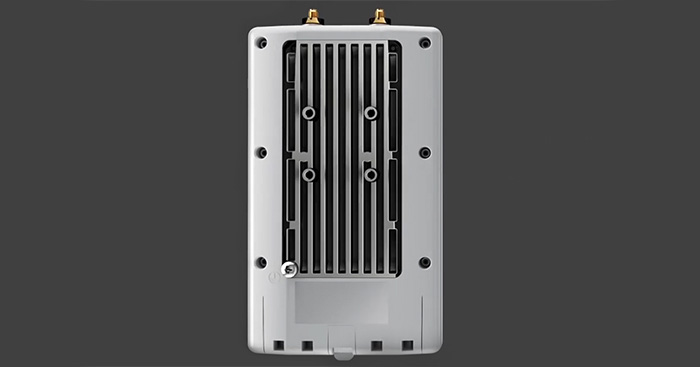
The rear side of the access point has a heavy rugged look, being covered by some sort of a tread pattern and it has five holes, from which four are used for mounting the device and one for grounding it. On the right side, there is a small recessed area with the EnGenius logo and five labelled LED lights which show the status of the 5.0Ghz radio, the 2.4Ghz radio, the LAN 2 and LAN 1 ports and the Power (each of these LEDs can be disabled using the provided software). On the left side, there’s a label which shows the Serial Number, the ETH MAC address (as well as the 2.4 and the 5GHz MAC addresses), the FCC ID and the IC.
On the bottom of the device, in between the three antennas, rest two protruded cable gland housings, each with a compression nut (similarly to the Ubiquiti Bullet M2-Ti), which ensures a proper protection for the Ethernet cables (it has one 802.3at PoE Input Ethernet Gigabit port and one 802.3af PSE Output Ethernet Gigabit port).
As can be seen, EnGenius went the extra mile to ensure the device will be able to remain functional during harsh weather, even if it meant a sacrifice from the design point of view, but it was worth it since, the ENH1750EXT will be able to withstand dust ingress and it can be submerged underwater down to 5 feet for 30 minutes, so heavy rains won’t be a problem for this AP (it’s IP68 rated).
Furthermore, the ENH1750EXT has ESD protection (8KV), but, you may need to purchase a separate surge suppressors and lightning arrestor for increased protection (lightning is one of the biggest enemies of any access point). The device will also withstand between 0 to 90% humidity and it will remain operational at temperatures ranging between -4 to 160 degrees F.
Inside the case, the Engenius ENH1750EXT is equipped with an Atheros QCA9558 micro-controller, 128 MB of RAM, 16 MB of flash memory and an Atheros QCA9880 chip for the 5GHz radio band and an Atheros QCA9558 for the 2.4GHz radio. This ensures a maximum theoretical data transfer rate of 450 Mbps on the 2.4GHz radio band and a maximum theoretical data transfer rate of 1,300 Mbps on the 5GHz radio band (if the signal is too poor and won’t be able to support the 1,300 Mbps with OFDM, then the device will apply the 11Mbps data rate with the DSSS technique).
Note: Inside the package, you can find one ENH1750EXT Access Point unit, six detachable antennas (each is properly labelled), a grounding cable, a pole mount bracket, a wall mount base, a mounting screw set, a Power adapter (48V/0.8A), a PoE injector (EPE-48GR), a Quick Installation Guide and a Technical Support card.

To perform a proper hardware installation of the ENH1750EXT, on the first step, you need to remove the cable gland, unscrew the compression nut and insert one end of an Ethernet cable to connect it to the PoE LAN port and, afterwards, you have to seal the cable and screw all the parts together; on the next step, insert the other end of the Ethernet cable into the AP Ethernet port on the PoE injector and connect the power adapter to the DC-In port on the injector (the other end of power adapter needs to be plugged into an electrical outlet); afterwards, take the second Ethernet cable and insert one end into the LAN port of the PoE injector and the other end into a computer (to be able to access the user interface).
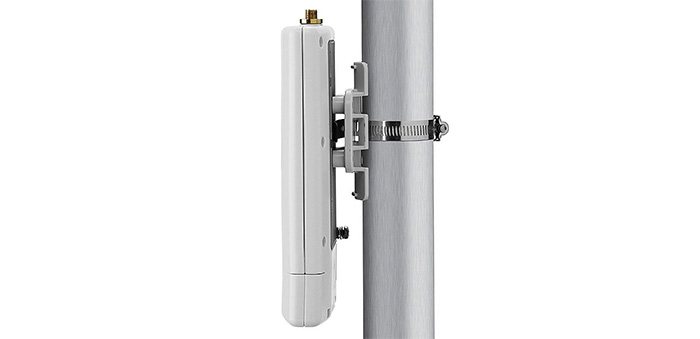
The ENH1750EXT can be mounted on the wall or on a pole and to do so, you need to first use four screws to attach the wall mount bracket to the back of the device and then drill four holes on the wall to attach the whole access point to the wall; the pole-mounting requires you to add the pole mount bracket on the back of the already attached wall-mounting plate using four screws and then use the provided pipe to attach the whole device to the pole.
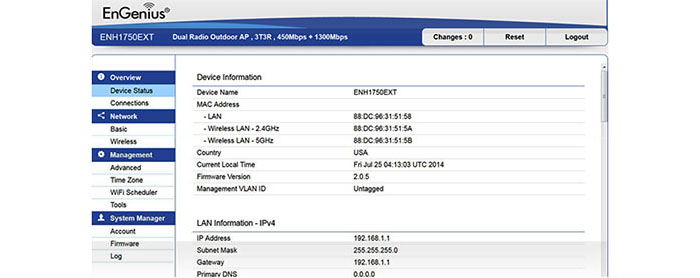
After the hardware installation is finished and you have connected the access point to a computer, you need to open a web browser, type https://192.168.1.1 in the URL bar (before this, you may need to change the TCP/IPv4 connection settings on Windows OS or Configure IPv4 if you use Mac OS X) and, when the Log In window pops up, enter admin for the username and admin for the password to gain access to the user interface.
On the main page there is a horizontal menu which shows the number of changes, allows you to Reset the device and Logout, while on the left, there’s a vertical menu consisting of four main sections: Overview (Device Status and Connections (displays a list of all the clients associated with either the 2.4 or the 5GHz radio band, along with the signal strength and the MAC address of each device)), Network (Basic (change the IP address, gateway, subnet mask and the DNS for the IPv4 or IPv6, or enable the Spanning Tree Protocol) and Wireless (change the Device Name, the region, enable Band Steering, as well as changing the 2.4GHz and the 5GHz network Operation Mode – can be Access Point or WDS AP/Bridge/Station -, the Wireless Mode, Channel HT Mode, Extension Channel, Transmit Power, Data Rate, RTS/CTS Threshold, Client Limits, Aggregation and AP Detection, as well as the SSID Profiles for each radio band, the Wireless Security and MAC Filtering – there are also some Advanced Wireless settings, such as the Wireless Traffic Shaping, Fast Roaming, WDS Link Settings, Mesh Settings, Guest Networks, Client Isolation, L2 Isolation, VLAN Isolation and Fast Handover)), Management (Advanced (SNMP Settings, CLI Setting, SSH Setting, HTTPS Settings, Email Alert), Time Zone, WiFi SCheduler and Tools) and the System Manager (Account, Firmware and Log).
The maximum distance I was able to get an Internet connection was at about 500 feet away from the access point (where I as able to open and play a Youtube video), while at a close range, I measured around 110 Mbps using the 2.4GHz radio and around 385 Mbps using the 5GHz radio band.
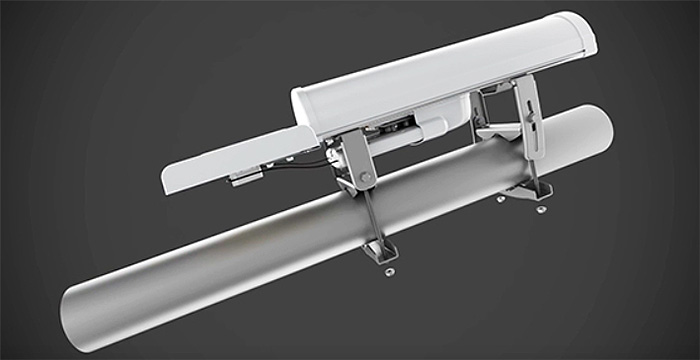
4. Cambium ePMP 2000 5 GHz Smart Outdoor Access Point

Cambium Networks is a relatively new name in the enterprise market, but, in reality the company was born from the well-known Canopy Networks and Orthogon Systems and the influence can be seen in the well-crafted fixed wireless broadband PTP (point-to-point), PMP (point-to-multipoint) and the ePMP platforms, which, while not being the most inexpensive solutions, they’re among the most stable (have a mature software) and the Cambium equipment seems to last a long time (a lot more than the devices from the competition).
That being said, the new ePMP hardware has been very favourably received by the public and one of the most popular device from this line is the Cambium ePMP 2000 5GHz Smart Outdoor Access Point which, besides being a reliable rugged outdoor-suitable device, it prides itself with a significant amount of enterprise-type features, from which two attract the most attention: the Smart BeamForming (has the role of reducing the effects of on-channel interferences) and the Intelligent Filtering (it reduces the off-channel interferences by shielding the used channel with the help of a dynamic filter).
Note: Cambium offers lots of free courses, as well as Certification Training.
The ePMP 2000 access point has undergone some serious design changes from the last generation (the ePMP 1000), the case now being rectangular and with very soft rounded corners (while the ePMP 1000 AP had a significant curve towards the bottom) and, while it kept the same carved logo, the indicators are now gone from the front of the device (the ePMP 2000 AP is covered entirely by a white matte finish and it does not retain any fingerprints). There are also some changes in size, although nothing significant, as the ePMP 2000 access point measures 8.75 x 4.9 x 1.75 inches, as opposed to the 10.6 x 4.3 x 3.0 inches of the 1000 series.
The top side of the access point is home to two polarized antenna ports (Antenna port H and V, both with a RP-SMA female connector), while on the rear side of the plastic case, there’s a large metallic section with narrow cut-outs and underneath it, there’s a label with information about the device (such as the Model and Part Number, the MSN, ESN and Wireless MAC address) and an unlocking mechanism which allows the user to easily remove the bottom port for revealing the ports + indicators & buttons area. If it is unused, you can cover the top side of the device with an environmental plastic cover (included in the package).
After removing the bottom section, you gain access to a Smart Antenna V port, a GPS Antenna connector (SMA, female), a Reset button (useful for either resetting the device or for returning the access point to factory default settings), a Gigabit Ethernet port (can be used for establishing a connection to a computer for management, as well as for PoE power input – the device is 802.3at compliant, but a non-compliant power supply can also be used, it just has to deliver at least 20W) and a Smart Antenna H port.
Next to the Ethernet port, you’ll notice that Cambium decided to position the block of LED indicators (while in the ePMP 1000 generation, these were on the front) which show the status of the Power (when the access point is turned on, the LED will be green), GPS (the LED will be orange the moment the AP acquires a 1PPS GPS synchronization pulse from either the internal GPS module or from a CMM), the number of the tracked satellites (if none of the three bars is lit, it indicates three or less satellites tracked, one bar lit shows four or five tracked satellites, two lit bars indicates six or seven satellites tracked and if all the bars are lit, then eight or more satellites are tracked) and ENET (this LED shows the acquired Ethernet link – red indicates a 10BaseTX link, green – 100BaseTX link and orange – 1000BaseTX link).
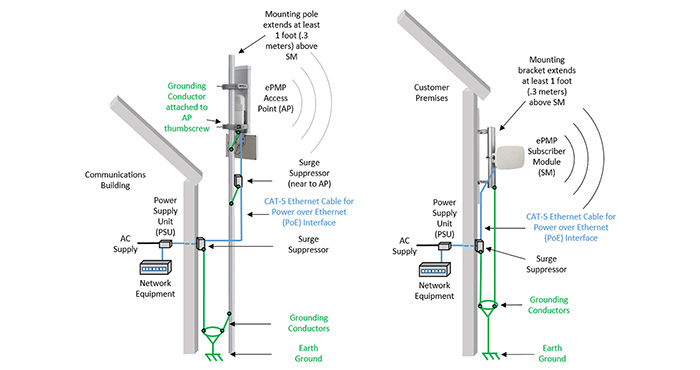
You can mount the Cambium ePMP 2000 access point on the wall or on a pole (the latter being the more flexible solution) and you need to make sure that the wind won’t move it (check if the pole bracket is solidly fixed, so the device will stay in place). Furthermore, the number one enemy of any outdoor access point is the lightning strike, so you need to take some measures to make sure you keep your equipment safe (although no precautions can completely guarantee that it will survive a lightning strike): use lightning / surge protection (conduct the surge current to ground using a separate path) and use a surge protector along with ground bonding (attach additional metallic parts to redirect the electricity away from your device and use a transient voltage surge suppression to maintain the voltage in check when lightning does strike).
Another potentially damaging weather element is the sub-freezing temperature and thankfully, Cambium has taken the necessary measures so the access point will survive (the ePMP 2000 AP features a 1 Joule Integrated Surge Protection).
First, be aware that the operating temperature ranges between -22 degrees F to 131 degrees F and, in case of really cold weather, the access point will take a while before start-up since, in case the power goes out and the radio may be underpowered for a while, if the device goes to full power immediately, it may cause condensation (a very bad thing for electronic devices), so Cambium takes its time with the internal heater until everything is up at optimum temperature before allowing the proper start up of the radio (the integrated heating mechanism will remain operational until the temperature is greater than 32°F).

Additionally, the outdoors access point features an IP55 rating, so it has a limited protection from dust ingress. In case of heavy rain, you can expect that both the Sector Antenna and Smart Antenna (which are a reliable addition to the standard access point) will suffer from the Rain Fade phenomenon (the microwave radio frequency signal gets absorbed by the rain or snow), so you will experience a lower RSSI.
As already pointed out, besides the access point, the Cambium ePMP 2000 series also features a Smart Antenna (needed in order for the user to take advantage of the Smart Beamforming feature) and a Sector Antenna, which offers a useful compact mounting system for both the access point and for the smart antenna and it features a front-to-back ratio of 35db and a wide frequency range. After you have finished mounting the device and you have connected a Ethernet cable to the available port on the access point, insert the free end of the cable into the power supply port labelled Data/Power and take another Ethernet cable and connect it to the Data port and into a management PC (of course, as the last step, insert the power cord into the power supply).
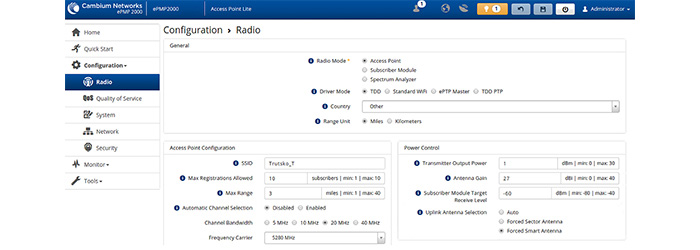
This way, you gain access to the web interface (by opening a web browser and going to 192.168.10.1, which is the default IP address for the AP mode), where you’ll be greeted by a main vertical menu: Home, Quick Start, Configuration, Monitor and Tools. The Home section shows the System Summary (the device name, SSID, the operating frequency, the operating channel bandwidth, the transmitter output power, antenna gain, the Ethernet status, the downlink / uplink frame ratio, the registered subscriber modules, if the cnMaestro Remote Management is enabled and more).
The Quick Start section allows you to select the Radio Mode, the Access Point Mode, the Max Range, the Frequency Carrier, the SSID, IP address, the Security and more. The Configuration section allows the user to set up the Radio (the Radio Mode, Driver Mode, Range Unit, the Subscriber Module Scanner and more), the Quality of Service (three-level priority with packet classification by COS, VLAN ID, IP + MAC address, DSCP, Station Priority, Broadcast and Multicast), the System (set up the Account Management, view the System Logging and configure the cnMaestro Remote Management access), the Network and the Security.
The Monitor section allows the user to view the Performance (shows Ethernet Statistics Transmitted and Received, the Wireless Statistics Downlink and Uplink), the System, Wireless (general info about the Wireless network, as well as a detailed list of all available APs), Throughput Chart, GPS, Network (the Ethernet Interface, the Wireless Interface, the Separate Wireless management IP Status, the Network Status, ARP Table) and view the System Log. The Tools section allows the user access to perform a Software Upgrade or Backup/Restore, configure the License Management (Flexible or Fixed), eDetect (a great tool for measuring the 802.11 interferences at the ePMP radio or the system on the used channel), view the Spectrum Analyser, Automatic Channel Selection, perform Wireless Link Test, as well as Ping and Traceroute tests.
Note: Cambium Networks offers some additional tools to manage and monitor your network, from which there’s the cnMaestro, which is a cloud-based controller (also available as an on-premise platform), the Android-based app cnArcher which offers an easy way to configure and align the PMP wireless subscriber modules, or the LINKPlanner which, as the name suggests, allows the user to create geographical models in order to find the most suitable area where to place the Cambium equipment.
5. TP-LINK CPE510 Outdoor Wireless Access Point
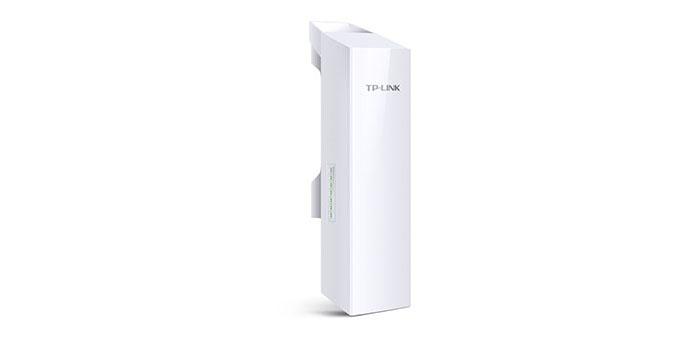
TP-Link slowly became a networking manufacturer giant and along with Asus, Netgear and Linksys, it is one of the main sources of consumer-type networking products. While it’s true that TP-Link isn’t as popular in the business market as with the home users, it hasn’t really neglected this market section, covering the VPN router niche, the smart switches, as well as the outdoor access points. One of its most successful affordable outdoor access point is the TP-Link CPE510, a High Power Outdoor CPE/AP device, part of the Pharos family.
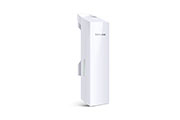
The TP-LINK CPE510 features a long rectangular plastic body, covered by a white matte finish. There are no antennas that point out of the case, but there is a High Gain Dual-Polarized 2×2 13dbi antenna built into the body of the access point. Unfortunately, the antenna is not omni-directional, therefore, it won’t cover 360 degrees around it, so you get a rather detrimental area while using it as an access point (it is ideal to use two of these units in order to cover a few miles, because the signal will reach only the devices which are “in front” of the antenna).
Regardless of that, you can replace the built-in antenna with a omni-directional one. In terms of protection, the CPE510 has a lightning protection of up to 6,000V, it operates between -22 and 158 degrees Fahrenheit and a humidity between 10 to 90 %. Additionally, the enclosure is rated as IPX5 waterproof, so it can withstand water jets for a brief period of time without being unaffected (similarly to the EnGenius ENS202EXT, the TP-LINK CPE510 is not protected against complete submersion under water, so, you may take that into account if you live in an area with frequent violent storms).
Inside the package, besides the unit, there is a passive PoE adapter, a power cord, an Installation Guide and some pole mounting straps. Ideally, you will mount the device on a pole (using the included straps) and you should not be scared by its dimensions. I know that from the pictures, it looks huge, but, in reality, you get 8.8 x 3.1 x 2.3 inches unit, which weighs less than 2 lbs.

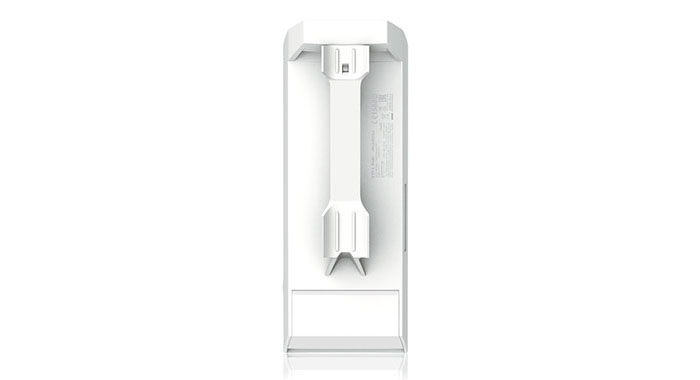
Overall, the design of the CPE510 is simple and minimalist, managing to be as non-intrusive as possible (you don’t want anything too fancy on the outside of your home). So, while the front of the device is plain and simple, on the bottom side, you can find a Grounding Terminal, a shielded 10/100Mbps Ethernet Port LAN0 (passive PoE in – since this is a proprietary TP-LINK variant, it is not compatible with normal PoE equipment: either 802.11af/at standards), a shielded 10/100Mbps Ethernet Port LAN1 and a recessed Reset button (press and hold the button for 8 seconds using a paper clip to return the access point to the factory default settings). On the left side of the device, there is an array of LED lights that show the status of your system: while in AP/AP-Router mode, all four upper LEDs will remain solid, otherwise, while in Client/Bridge/Repeater/AP Client Router mode, the more of the four upper LEDs will light up, the better the wireless signal strength. The last three LED lights address the status of the LAN1, the LAN0 (if it’s flashing it means that there is a device connected to the port and it’s active) and the Power.
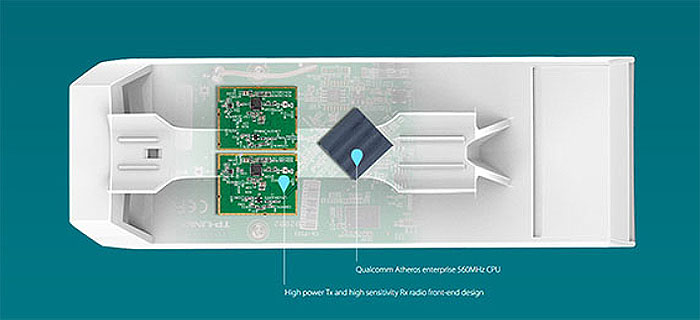
Inside the case, the TP-LINK CPE510 is equipped with a 560 MHz Qualcomm Atheros Enterprise AR9350-BC2B SoC, 64 MB of DDR2 RAM, 8 MB of flash memory and an Atheros AR9350 chip dedicated for the WLAN. The CPE510 uses the 5GHz radio frequency (IEEE 802.11a/n) and there is no 2.4GHz radio band available (not a big loss, since it has become very crowded).
In order to install the TP-LINK CPE510, you need to be aware by a couple of things: you need to maintain a clear line of sight between the access point and the wireless devices that will connect to the network and an elevated position is the ideal one, while keeping an eye to maintain the number of trees and other obstructions to a minimum (don’t forget that the antenna is not omni-directional, so you only get an angle of about 45 degrees). The hardware installation requires that you remove the cover to reveal the ports, take an Ethernet cable and connect one end to the LAN0 from the AP and the other end to the PoE injector (you get up to 200 feet Power over Ethernet deployment) and connect the Power cable to the PoE injector and to the wall outlet. Lastly, take another Ethernet cable and insert one end to the LAN port on the injector and the other to a computer, in order to initiate the configuration process (there is no mobile possibility to configure the device).
Before accessing the installation process, you need to assign a static IP address (so it doesn’t get in conflict with the default IP of the access point) and then open any web browser to go to https://192.168.0.254. Afterwards, you will be prompted to enter the user name and password (admin for both) and click Login (immediately after you get to change the default password and user name). From here on, you are free to roam the Pharos interface and further configure your device.
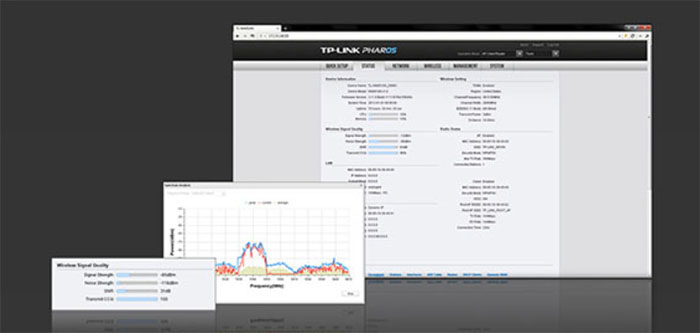
The UI is simple, with a modern and minimalist design, featuring a top horizontal menu for: Quick Setup, Status, Network, Wireless, Management and System. The Quick Setup section gives you the possibility to configure the operation mode of your device: you can choose between Access Point (supports multiples SSIDS), Client, Repeater (Range Extender), Bridge, AP Router and AP Client Router (WISP Client) – each has a short description about the way it’s going to operate (choosing any mode, will initiate a short setup wizard). The Status section shows you the Device Information, the Wireless Settings, the Wireless Signal Quality, the Radio Status, the LAN and WAN information, as well as the Monitor sub-section, which gives you live statistics about the throughput rate, the stations, interfaces, routes, DHCP clients and the ARP table.
The Network section contains the LAN settings and the IP and MAC Binding, while the Wireless section includes the Wireless Basic Settings, the Wireless AP Settings, Multi SSID, Wireless MAC Filtering and Wireless Advanced Settings. The Management section includes the System Log, Miscellaneous, Ping Watch Dog (a very important feature that will ping the Internet gateway and, in case the connection has been reset, it reboots the device, so you don’t have to manually restart it), the Dynamic DNS, the Web Server and the SNMP Agent. The System section has the following options: Device, Location, User Account, Time Settings, Firmware Update and Configuration.

While configuring any of the available modes, you need to understand what the Pharos MAXtream feature does, because you will be asked if you want to enable it or not. Well, the MAXtream is a proprietary protocol which strives to eliminate any collisions, increase the network capacity and stability, and deliver a better QoS for voice, video or any similar data stream. This is done by dividing the transmission timing into slots and transmit them in rapid succession, so there are less chances for any collisions. But, there is one significant flaw: it’s only compatible with devices from the TP-LINK’s Pharos series. Don’t enable it if you want to connect other WiFi devices to the CPE510, as you will not be able to.
TP-Link claims that the CPE510 can broadcast the Internet signal to more than 10 miles and, while I did not test it to such a great distance, I can say that at about 1,500 feet, the signal dropped to about 75 percent, but there were some interferences. At about 500 feet, in good weather and low humidity, the signal strength averaged between 30 to 38db. Obviously, the 10 mile claim is in ideal conditions, but it’s clear that the CPE510’s signal can reach really far.
6. Ubiquiti Bullet M2 Titanium WAP AirMax BM2-TI
Ubiquiti Networks is a relatively young networking company which mainly focuses on the enterprise market and, at the same time it addresses the emerging and under-served markets. Ubiquiti is well known for its UniFi series, as well as airMAX and airFiber, and I have already had a look at an indoor wireless access point solution (the Ubiquiti UAP-LR Enterprise AP), which proved to be a reliable piece of technology at an acceptable price. Moving forward, I am going to focus on a unique piece of technology, called the Ubiquiti Bullet M2 Titanium, which is part of the AirMax series.
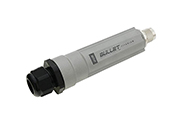
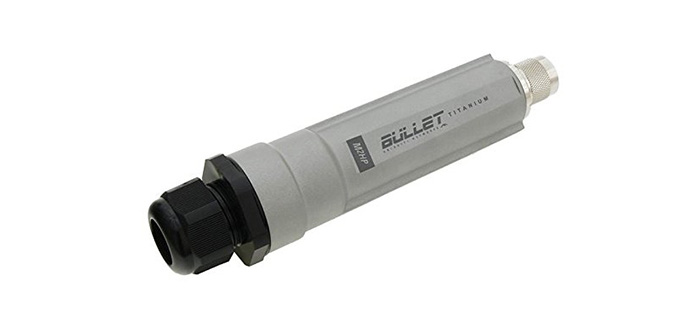
The Bullet M2-Ti doesn’t look like the other devices from this list: there is no rectangular or circular shape, because Ubiquiti adopted a rather unorthodox approach when it designed the M2. As the name suggests, the M2-Ti looks like a bullet, having a cylindrical body made of aircraft-grade aluminum, covered by a grey finish. While holding the M2-Ti in hand, it’s clear that we are dealing with a rugged device, which can withstand the elements: it is waterproof, but don’t submerge it under water (since it can handle only splashes of water), does a better job with moisture (than its plastic counterpart), it remains operational between a temperature of -40 to 80 degrees (it withstands strong winters), it can handle humidity between 5 to 95% (condensing) and it has a high resistance to shock and vibration (ETSI300-019-1.4).
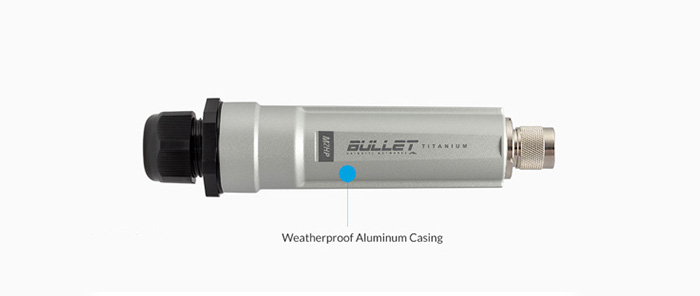
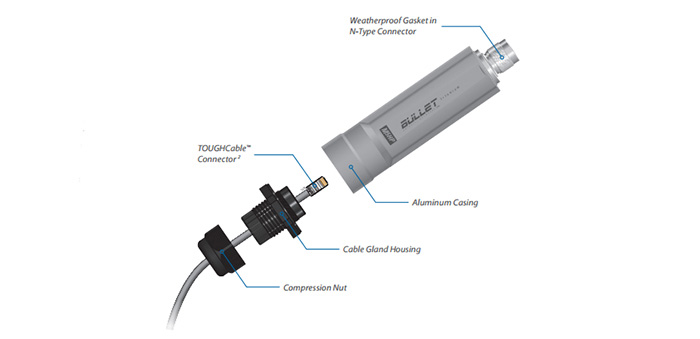
The choice to make the Bullet M2 of aluminum was a good move from Ubiquiti, since the previous plastic model was having a hard time during harsh weather. The Bullet M2-Ti does not have an antenna, only an upper N-Type connection gasket (which is weatherproof), so you can add any type of antenna you wish.
Inside the package, you get the Bullet M2 unit, a PoE Adapter (24V, 1A), a power cord, a Quick Start Guide and an N-type right angle adapter. You won’t get any type of straps for mounting it on a pole, so you will have to get those yourself and, since this device is vulnerable to lightning, you should also add a Lightning/Surge Arrester between the Bullet and the antenna. The device itself is very small and compact, its dimensions being 7.5 x 1.8 inches and its weight, 0.43 pounds.
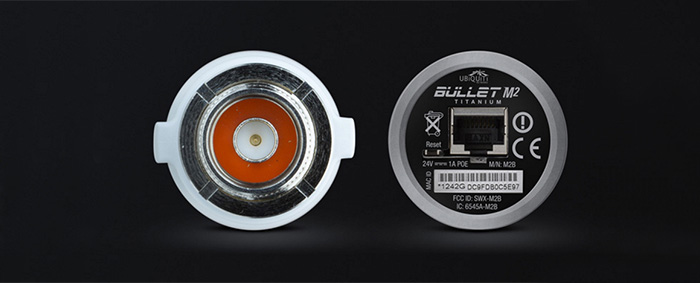
The powder coated aluminum case of the Bullet M2 does not have any LED lights to reveal the status of your network, nor any visible ports, but if you unscrew the black bottom part, it will reveal a single 10/100 Ethernet Port (a passive, proprietary PoE, which is not compatible with the usual PoE equipment: either 802.11af or the 802.11at standards) and the removable part includes a Rubber Washer, a Cable Gland Body, a Compression Seal and a Compression Nut.
Inside the case, the Ubiquiti Bullet M2 is equipped with an Atheros AR7241 MIPS 24KC processor clocked at 400Mhz, 32 MB of SDRAM, 8 MB of flash memory and an Atheros AR928x for the wireless network interface controller. The Bullet M2-Ti uses the 2.4GHz radio frequency (802.11a/b/g/n) and it lacks the 5GHz radio band (the Bullet M5-Ti has this feature).
The hardware installation of the Bullet M2-Ti consists of removing the Cable Gland Body (the black bottom part), afterwards unscrew the Compression Nut and remove the Compression Seal. Now, take an Ethernet cable and insert one end through the Compression Nut and add the Compression Seal around the cable. Next, put the Ethernet cable through the Cable Gland Body and connect the cable to the Ethernet port at the bottom of the Bullet unit. Lastly, screw all of the parts tightly together to ensure a proper protection.
You can now take the other end of the Ethernet cable and insert it into the PoE port of the PoE injector and insert the power cord into the injector and into a wall socket to power up the device. On the upper part, you can add a powerful antenna to ensure a strong signal (sure, you can choose a directional antenna if you only want to use the Bullet for PtP applications, but, an omni-directional antenna is the better choice, especially if you want to use the M2 as an access point and cover a large area all around the device). If you want to configure the Bullet M2, you need to connect a second Ethernet cable to the LAN port on the PoE injector and into a computer.
Ubiquiti offers a web utility called airOS that can be accessed by typing https://192.168.1.20 into a web browser (before this, you need to configure the host system to use a static IP address). From here, you will be prompted to enter the user name and password (it’s ubnt for both). The interface has a horizontal top menu with links towards the main sections: airMAX logo, Main, Wireless, Network, Advanced, Services and System. The airMAX logo allows you to enable the airMAX feature, choose the airView port (the airView feature gives you real-time spectral views, as well as waterfall and waveform in order to easily identify noise interferences), enable the Long Range PtP Link Mode and enable the airSelect. The Main section shows the status of the device and it allows you to monitor the system by giving a graphical live representation of the throughput, showing the AP information, the Interfaces, the ARP Table, the Bridge Table, the Routers and Log.
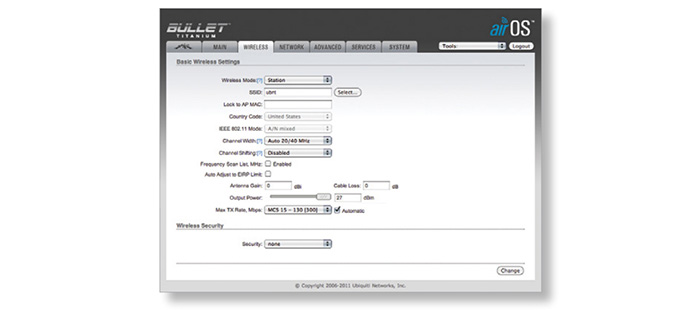
The Wireless section includes the Basic Wireless Settings (choose the Wireless Mode – Station, Access Point, AP Repeater -, enable the WDS, choose the SSID, the WiFi standard, channel width, the output power calculate the EIRP limit and more) and the Wireless Security (includes the RADIUS MAC Authentication and MAC ACL, as well as the Security type: WEP, WPA, WPA-TKIP, WPA2, etc).
The Network section allows you to choose the Network Role (choose the Network Mode: Bridge, Router or SOHO Router), the Configuration Mode (can be Simple or Advanced and both include a lot of options: Port Forwarding, DHCP Address Reservation, VLAN Network, Bridge Network, Firewall, IPv6 Firewall, Traffic Shaping) and change the Management Network Settings. The Advanced section allows you to configure the Advanced Wireless Settings (includes the RTS Threshold, Distance, Aggregation, Sensitivity Threshold, Installer EIRP Control), the Advanced Ethernet Settings (LAN0 Speed) and the Signal LED Thresholds.
The Services section allows you to configure the Ping Watchdog (a vital feature which reboots the device automatically in case the Gateway router resets, so you don’t have to diagnose the problem yourself and restart the Bullet manually), the SNMP Agent, the Web Server, the SSH Server, the Telnet Server, the NTP Client, the Dynamic DNS, the System Log and the Device Discovery. The System section gives you access to the Date Settings, the System Accounts, the Device name and the Interface Language, it allows you to perform a Firmware update, enable the Reset button, choose the Location, Reboot the Device and perform the Backup or Return to Factory Defaults. Next to the Logout button on the top menu, there is a Tools drop down menu which contains the following options: Align Antenna, Site Survey, Discovery, Ping, TraceRoute, Speed Test and airView.
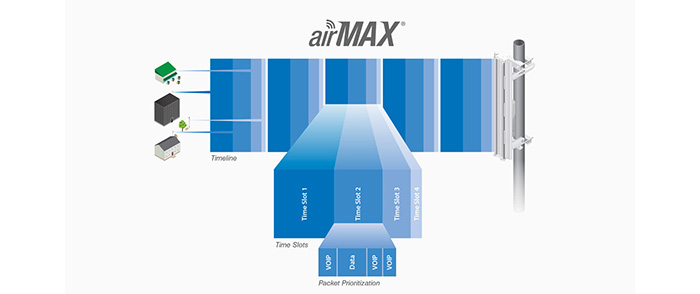
Ubiquiti takes great pride into the airMAX feature (you may have noticed it while configuring the Bullet M2), which has the role to transform the device into a potent TDMA Base Station, so you can scale your network using Point-to-MultiPoint configurations, while maintaining a low latency and a high throughput speed. The problem is that people don’t understand that this feature can solely be used in collaboration with other ubnt devices. If you want to use the Bullet M2 as a regular access point and connect your smartphones, tablet, smartTVs and so on to the network, you must disable the airMAX feature and switch to the 20MHz channel (don’t forget to setup a strong passkey for security purposes). In terms of wireless performance, the Bullet M2 depends mostly on the type of antenna you buy for it (for example, I used a 6dbi antenna and had a stable throughput at 500 to 600 feet in a zone with some mild interferences, so it can perform even better if there aren’t many conflicts).
7. Ubiquiti UniFi AP Outdoor+ (UAP-Outdoor+)
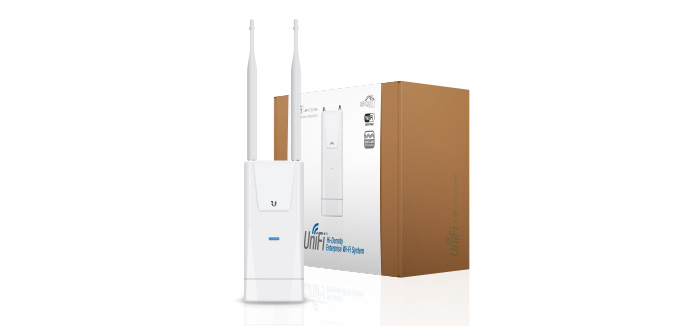
The young networking products manufacturer, Ubiquiti Networks, is getting more popular with every released device and is one of the fastest ascending networking company in the world, slowly becoming a serious rival to the already established and more traditional manufacturers, such as Cisco and Juniper. Of course, Ubiquiti’s approach is to give businesses and home Internet users access to technologies that before, were accessible only at enterprise-level prices. I already had a look at an interesting outdoor device from Ubiquiti called the Bullet M2 Titanium WAP AirMax BM2-TI, but, since, some of the most popular devices from Ubiquiti are part of the UniFi series, I had to also test the UniFi AP Outdoor+.
Similarly to the EnGenius ENS202EXT, the Ubiquiti UniFi AP Outdoor+ features a long, rectangular case, which is covered by a white glossy finish and, from the top, there are two 5 dBi Omni antennas that point upwards (white is the default colour choice for almost every other outdoor access point from the market). Design-wise, the UAP-Outdoor+ looks nice, especially because of the soft, rounded corners and it’s laudable that this isn’t a large device (it only measures 8.07 x 3.27 x 1.46 inches and weighs 10.37 oz, with the antennas connected), so it will blend in nicely with the environment.
Unsurprisingly, the UAP-Outdoor+ is not water-proof and it does not have any IP or NEMA rating, which should be common sense when we’re talking about an outdoors device and it will raise some concerns, especially if people want to use this AP where the weather is unforgiving. Regardless of that, the UniFI AP Outdoor+ will handle outdoor conditions just fine, but you need to be careful not to submerge the device under water completely and if there are frequent heavy storms, you may want to position it where it won’t be directly hit by the storm – otherwise, disconnect it for a while and let it dry before activating it.
Also, remember that the device will function if the operating temperature is between -22 to 149 degrees F and if the humidity is between 5 to 95% (non-condensing). The true enemy of any outdoor access point is not the water, but the lightning. If a lightning strikes your access point, in the best case scenario, you will lose the antennas, otherwise, it will fry your entire device, so it is important to keep it safe by installing a lightning rod and use surge arrestors (and of course, use the ground wire). The good news is that the UAP-Outdoor+ has an ESD/EMP Protection of 24KV. If you worry about RF exposure, then install the antennas at least 10 inches from any person and be aware that the device should not be operating in conjunction with other antennas or transmitters.

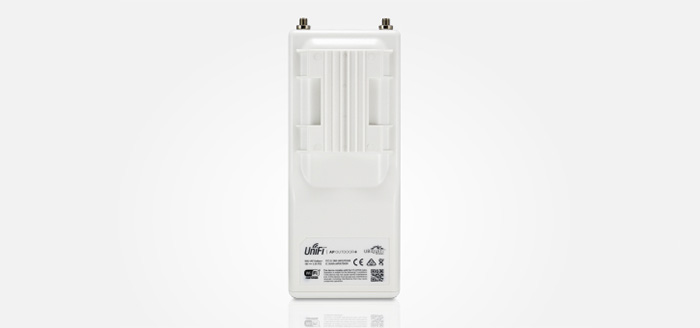
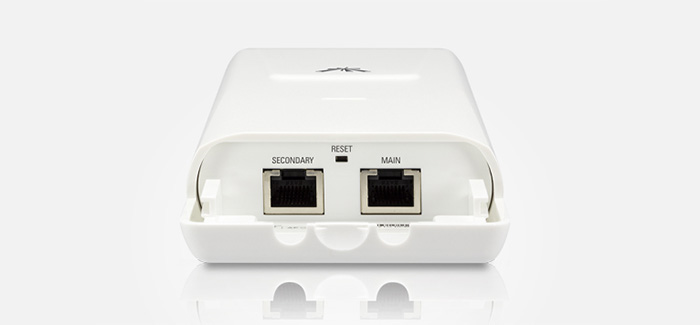
On the front of the access point, underneath the small plastic protrusion, there’s a small LED light which shows the status of your system: if the light is white, then the system is initializing, if it’s alternating between blue and white, then the device is busy (wait until it finishes the process), if it’s flashing a blue light, then you initiated the Locate process and the device is finding other APs; if the LED is solid blue, then the device has been integrated into a network and lastly, if the LED is solid blue, but with occasional flashing, it indicates that the AP is in an isolated state. If you slide the bottom part of the UAP-Outdoor+, it reveals the Secondary 10/100Mbps Ethernet port (suitable for creating a bridge), a small Reset button (press and release quickly to reset the device or press and hold the button for more than 5 seconds to return the AP to factory default settings) and the Main 10/100Mbps Ethernet port (used to connect the AP to the LAN and DHCP server – the power can be provided by either the included PoE adapter or a 48V, 802.3ad compliant switch). On the top, there are two RP-SMA connectors for the two 5 dBi omni-directional antennas.
Note: The package contains the UniFi AP Outdoor+ unit, the two external antennas, a wall mount bracket, a metal strap, three M2.9×20 screws, three M3x20 screw anchors, a passive PoE adapter (48V, 0.5A), the power cord and a Quick Start Guide.
Inside the case, the Ubiquiti UniFI AP Outdoor+ is equipped with an Atheros AR7242 CPU (clocked at 400MHz), 8MB of storage memory, 32MB of RAM (Winbond) and an Atheros AR9283 b/g/n 2×2:2 chipset (for the 2.4GHz wireless capabilities). This outdoor access point does not support the newer 802.11ac standard, nor the 5GHz radio band (so, you will have to settle with the more crowded, but with a longer range, 2.4Hz radio band).
The UAP-Outdoor+ can be mounted on the wall or on a pole. To wall mount the device, you need to take the wall mount bracket and use the screw anchors and the screws to sturdily fix the bracket on the wall and then, take the AP unit and slide it inside the special notches until it locks into place. To mount the access point on a pole, you need to slide the metal strap through the back of the UniFi AP and use a screwdriver to securely fasten the strap to a pole. After you either fixed the UAP-Outdoor+ to a pole or a wall, slide open the bottom part (lift the locking tab first), insert one end of an Ethernet cable into the Main port and the other end into the PoE port from the PoE adapter. Next, take another Ethernet cable and connect one end to the LAN port on the PoE adapter and the other to a switch or computer (to configure the system). Lastly, you have to insert the power cord into the other side of the PoE adapter and connect it to a power outlet.
Ubiquiti gives you access to an interesting software called the UniFi Controller (it can be downloaded from downloads.ubnt.com/unifi), which allows you to manage and view the statistics of your wireless network. After you install the utility, the UniFi Setup Wizard will launch automatically: it guides you through selecting the country and the timezone, as well as selecting the device you want to configure (if you have more than one), configuring the WiFi (SSID, Security key and create Guest SSIDs), creating the administrator name, email and password and, lastly, entering or creating the Ubiquiti account user name. Now, that you finished the initial setup, you can log into the interface.
The controller’s interface is very comprehensible and looks extremely modern and fresh (as expected from Ubiquiti). On the header, there’s a Refresh button, the Current Site (Overview, Add a new site and Import site) and the user name (Preferences, Edit and Logout). On the left, there are the main options (aligned vertically) and sectioned into two separate arrays: the first series includes the Dashboard, Statistics, Map, Devices, Clients and Insights, and the second series includes the Events, Alerts, Settings and Live Chat Support (each of these options opens a new central window).
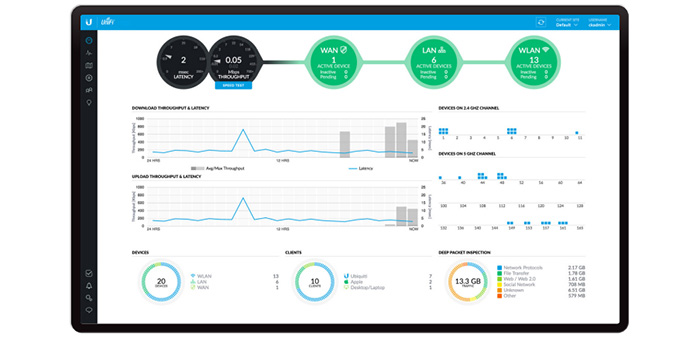
The Dashboard window has a colourful graphic representation of the system status (includes sections such as Download/Upload Throughput and Latency, the Speed Test Monitor, the Devices on the 2.4GHz and the 5GHz Channel, the number of WLAN, LAN and WAN devices, the type of Clients (Ubiquiti, Desktop, Android or Apple) and the Deep Packet Inspection). The Statistics window provides you with a visual representation of all your clients and the network traffic, it shows different stats about your Clients, the Current Usage of the Top Access points, a Quick Look over the most active clients and access points, and the Recent Activities.
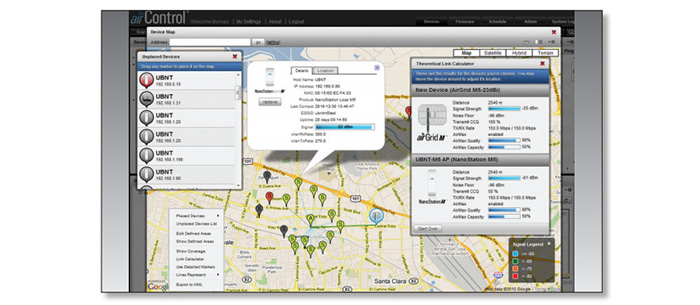
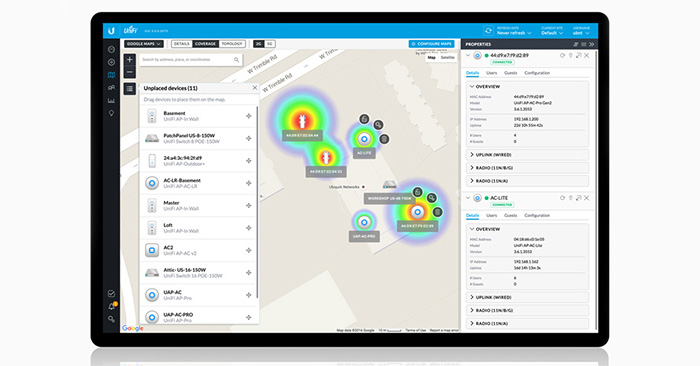
The Map window is one of the most interesting features of the controller: it allows you to upload custom map images of your home or neighbourhood or simply use Google Maps™ to show a graphic representation of your network system topology. After selecting the proper area map, you can place device icons (such as UniFi AP/AP LR, UniFi AP AC Lite/LR/Pro or, in our case, UniFi AP Outdoor+), each with its own status colour; you can also add filers to show the 2.4GHz or 5GHz devices, display labels for each client, display a visual representation of the wireless range of your AP or of the network connections between your access points.
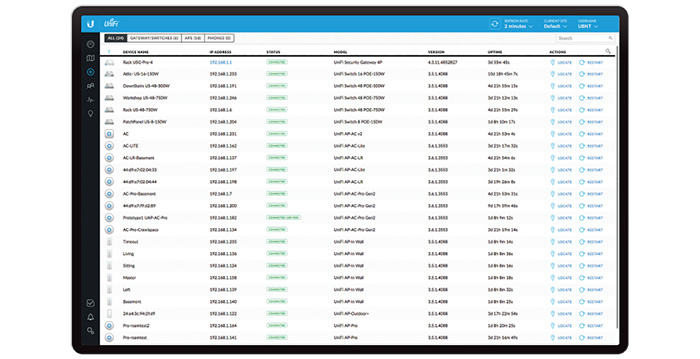
The Devices window displays all the connected UniFi devices discovered by the controller (you can apply filters to view different status information) and the Client window displays all the connected clients (again, you can apply various filters to view different type of clients and status info). The Insights window display different types of status information and filters it by the Known Clients, Neighbouring Access Points, Dynamic DNS, Remote User VPN and so on.
The Events tab shows you the recent events, as well as the corresponding device icon, name message and time. The Alerts tab displays a list of all the important events (when there’s a new alert, there’s going to be an orange circle near the bell icon). The Settings tab allows you to configure the Site, the Wireless Networks, the Hotspot 2.0, the Networks, the Routing & Firewall, the Guest Control, the Profiles, the Admins, the User Groups, the DPI, the Controller Access, the Maintenance and the Auto Backup.
To get the best wireless performance, you may need to pick non-standard channels (such as 8 or 13) since the 2.4GHz channel is overcrowded and the network may under-perform. So, in good conditions, the Ubiquiti UniFI AP Outdoor+ will be able to provide a stable wireless performance and a coverage of up to 600 feet (close-by, at around 40 feet and with about 15 clients connected at the same time, I measured an average speed of 27 Mbps).
FEATURES TO LOOK FOR BEFORE CHOOSING THE BEST OUTDOOR WIRELESS ACCESS POINT
First of all, what is an outdoor wireless access point?
Simply put, a wireless access point is an interface that takes the data from a wired connection (LAN), converts it to a 2.4 or 5GHz wireless signal and further transmits (and receives) it to all devices that have a wireless adapter. It differs from a router in the sense that it lacks the built-in switch functions, the NAT capabilities and it won’t serve internal IP addresses to connected device.
An outdoor wireless access point works pretty much the same as an indoor WAP, but there are usually some additional features:
1. The case has to be rugged, so it can handle the weather elements.
Obviously, this is a vital feature to look for when dealing with an ‘outdoor’ device, because it has to be able to handle extreme temperatures (the biggest problem is the winter, as most devices fail during this season), humidity (most will handle between 5 to 90%), rain and storms (it is important that there are no exposed orifices and all ports and connectors are covered and protected against water – most manufacturers won’t provide a full water-proof experience, where you can submerge the device underwater, but the access points should be able to handle water splashes) and it should handle a beating in case of a hailstorm.
2. It should be protected against lightning strikes.
The combination between the high altitude mounting and the antennas can be deadly for your wireless access point, since antennas will act as magnets to electricity. The first way to protect your devices is to use lightning rods on top of the poles, which will attract the lightning away from the WAP. Next, you should use surge arresters and surge protectors (with a proper grounding) so, in case your device gets hit by lightning, the damage will be minimum (it’s cheaper to change an antenna than the entire access point unit).
3. The antenna signal gain.
Some may say, the higher the better, but, depending on the applications, it may be wiser to choose an antenna with a lower gain (the higher gain pattern usually radiates the signal through objects, so, if the gain is lower, you get a shorter distance but as broader area, while the higher gain will send the signal far away, but will cover less area). Also, be aware that some devices use omnidirectional antennas (suitable for access point applications) and other use directional antennas (less angle, it requires aim and it’s better for Point-to-Point applications, like wireless bridge). By default, omnidirectional antennas will have a lower gain, while directional antennas will have a higher gain.
4. How much area can it cover?
This one is interlinked with the previous section because it’s dependent on the antenna type. If you want a hotspot (wireless access point), it is advisable to not go further than 400 feet because some devices won’t be able to transmit the data back (some phones and tablets) and to use omni-directional antennas (it won’t go too far, but will cover a broad area). For Point-to-Point applications, you need a directional antenna, so the devices will be able to transmit and receive over miles of space (some devices in this list were able to send the signal to more than 10 miles).
5. Easy setup.
Unfortunately, it’s not really straight forward to configure a wireless access point and many devices are simply WiFi radios, ready to be configured as either Access Points, WDS (Access Point, Bridge or Station), as Client Router, Bridge or SOHO Router. This implies that you get a heavy set of features and you need a bit of know-how to properly configure the setup you want. Sure, some manufacturers have made it relatively easy (Ubiquiti and TP-Link), while others decided that it’s better for the users to go the hard way (a steep learning curve) and feel victorious when they actually make the devices work (Mikrotik, Cisco and EnGenius).
6. Newest technologies implemented.
Since networking products are becoming more and more affordable, you can expect even the newest technologies implemented in devices with reasonable prices. For example, TP-Link and Ubiquiti have specific technologies that enhance the signal between devices from the same family, others have included mesh capabilities, MIMO and so on.
7. Power over Ethernet.
Obviously, it’s ideal to power up the device using only the Ethernet cable, but, so far I haven’t found a device (with a reasonable price tag) that didn’t require a Power adapter to be connected to PoE injectors (which are passive and proprietary to a specific manufacturer). But, hey, you don’t have to run a second cable on the pole, which is a positive thing.
8. The WDT feature (Watchdog Hardware Timer)
This feature is very important because it verifies periodically if the Gateway (usually router) sends Internet data and if there has been a reset, it automatically reboots the Access Point, so you don’t have to do it manually.
Mark is a graduate in Computer Science, having gathered valuable experience over the years working in IT as a programmer. Mark is also the main tech writer for MBReviews.com, covering not only his passion, the networking devices, but also other cool electronic gadgets that you may find useful for your every day life.


